Read how to adjust the control drive of the gearshift mechanism on a VAZ 2110 car. A diagram of the device is presented.

If during the operation of the car you have problems with gear shifting (there is no clear shift), then it's time to adjust the drive that controls this mechanism. Also, these works must be carried out immediately after you removed the gearbox, repair it and reinstall it, since after such actions the entire gearshift mechanism "diverges".
We did the tuning on a VAZ 2110 car.
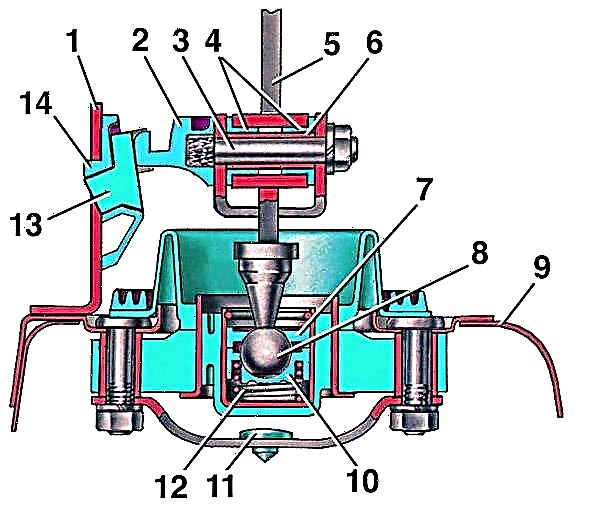
Adjustment of the gearshift control drive

| 1 - bracket for blocking backing; | 8 - spherical pin of the gear change mechanism; |
| 2 - axis stop; | 9 - body floor; |
| 3 - axis of the gear shift lever; | 10 - ball bearing; |
| 4 - axle bushings; | 11 - buffer; |
| 5 - gear shift lever VAZ 210; | 12 - spring; |
| 6 - distance sleeve; | 13 - template 67.7834.9527; |
| 7 - spherical washer of the ball joint; | 14 - bracket cover. |

1. On the control rod of the gearbox, it is necessary to loosen the nut of the clamping bolt of the clamp, it is enough to unscrew the bolt by 4-5 turns (you will need a wrench for 13). It can only be reached from the bottom of the car. 2. In order to ensure free movement of the rod relative to the gear selection rod, the grooves at the end of the rod and the clamp should be expanded with a screwdriver. Then put the stem in neutral.

3. Next, we go to the passenger compartment and dismantle the gearbox cover from the handle. It can simply be lowered to the very bottom, and the lever set in such a way that its lower (non-bent) end is approximately vertical.
If you have a template 67,7834,9527, then set the gearshift handle as follows: with the lever cover removed, install the template in the window (number 14 in the diagram above) of the reverse lock bracket.
Next, insert the stop of the axle (2) of the lever (5) into the groove of the template (13) and press it against the template in the transverse direction, without causing elastic deformation of the bracket (number 1). Lock the lever (5) in this position.
4. Under the bottom of the machine, carefully, not by sharp movements of the hand, select the axial play of the rod in the rearward direction and its angular play in the counterclockwise direction (do not move the gear lever).

5. Now you can re-tighten the nut of the clamping bolt of the clamp under the car, only adjust the clamp itself a little forward so that there is a free space between it and the rod of about 2-3 millimeters.